Settings
The Settings widow contains many configuration settings for Persephone. It has four tabs: Plate display, General display, Balloon, and System.
Plate display
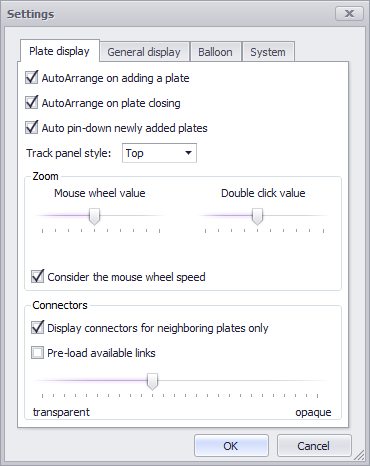
The first two check-boxes will AutoArrange the plates on the stage when you either add or close a plate. The Auto pin-down of newly added plates checkbox will automatically pin down all plates you add regardless of whether you select the checkbox in the Map Names selection panel. The Track panel style will enable you to specify the location of the track panel to the left side of the plate or the top of the plate (for all plates).
The Zoom panel provides controls to change the zoom increment when using the mouse wheel or double-click to zoom in on maps. The zoom increment can be increased from the smallest (1) to the largest (10) increment per movement of the mouse wheel (Mouse wheel value) or per double-click of the mouse (Double click value). The faster the mouse wheel is spun, the greater the zoom increment if the Consider the mouse wheel speed is checked.
Connectors
You can limit the display of ortholog connection lines to just adjacent plates by checking the Display connectors for neighboring plates only checkbox. Connectors displayed between non-adjacent plates may make viewing difficult. The opacity of the connector lines can be changed from transparent to opaque using the slider bar. In addition, you can check (select) Pre-load available links to speed up performance.
General display
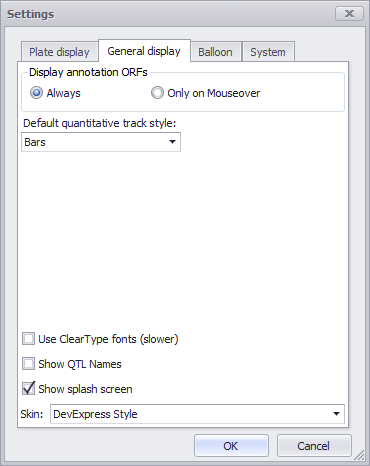
In the Display annotation ORFs (open reading frames) box click either the Always or Only on Mouse-over radio buttons. From the Default quantitative track style drop-down list select either Bars or XY Plot.
If the Show QTL Names checkbox is checked then the QTL names will automatically be displayed in the chromosomal maps under the QTL tab. Clear Type fonts, which will provide a slightly improved display appearance, will be used if the box is checked. A splash screen is displayed when you initially open the application if Show splash screen is checked.
The Skin field provides a drop-down menu to enable you to select among various styles for the graphical user interface. This online help uses the DevExpress Style selection for screenshots, which gives Persephone a standard Microsoft Windows application look and feel. If you select McSkin, for example, then Persephone will have a look and feel similar to Apple Macintosh applications.
Balloon
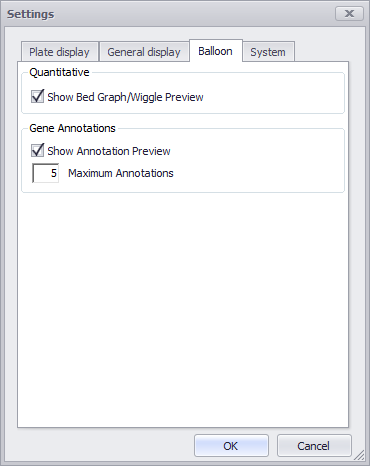
If you select the Show BedGraph/Wiggle Preview checkbox, a tool tip will be displayed over the data track displaying a small graphic showing the data track name, a graph of the data and data values. If the box is not checked only the name of the data track and data values only will be displayed in a tool tip. This applies to both the vertical and horizontal data track views.
A miniature graphic gene model will appear in a tool tip if Show Annotation Preview is checked. Otherwise, only a textual annotation of the gene will appear in the tool tip. You can also control the number of annotations that will be displayed by entering the maximum value in the Maximum Annotations box.
System
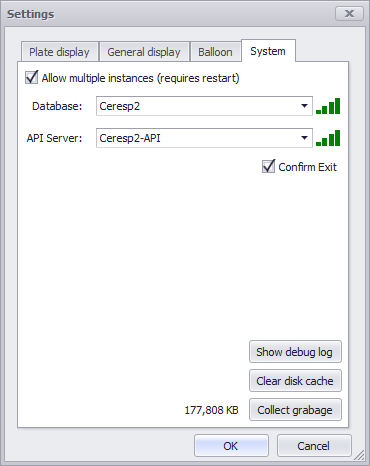
You can have multiple instances of Persephone running on your local machine if you click on the top checkbox. The Database and API Server fields will display the names of the specific resources that you are accessing with Persephone. The bar icons at the end of each field will display the network latency — the more bars the better — and tool tips will give the specific numbers for the named resource. If Confirm Exit is checked, Persephone will display a window asking you to confirm that you want to exit before the application will close.
The System tab also contains Show debug log, Clear disk cache, and Collect garbage buttons for maintenance and debugging purposes.
 Copyright © 2009-2024 by Persephone Software. All Rights Reserved.