Setting Up BLAST
Note
The Persephone system is now supplied in the form of a single Docker image. Once the Docker image is installed, you can start using PersephoneShell to populate the data and run the Persephone application. Please refer to this page.
The text below and the following pages are provided here for those who want to install (and configure) the Persephone components separately, without using Docker.
Warning: The rest of this page is obsolete.
A Basic Local Alignment Search Tool (BLAST) server is a regular web server that hosts a "wrapper" program that executes BLAST searches on the server and sends the results back to Persephone. This server can be hosted on Windows or Linux. We recommend to download the latest version of the package from NCBI. (Contact us at http://persephonesoft.com/contact for assistance.)
Note
Persephone supports NCBI-BLAST 2.2.19 and later (including "plus") versions of NCBI-BLAST.
Step 1: Set Up BLAST Server
Click the appropriate link below depending on your server's operating system:
- Windows Internet Information Services (IIS) 7 Servers
- Windows Internet Information Services (IIS) 8 Servers
- Linux Servers
Windows Internet Information Services (IIS) 7 Servers
The steps below provide a typical example of creating a BLAST server on a Windows Internet Information Services (IIS) 7 server. Please note these steps are intended as a general guideline only. For example, steps and configuration windows may vary due to differences between versions of Microsoft Windows. Please refer to Microsoft's IIS Configuration Reference site for more information.
- Start the IIS Manager.
- Create a virtual directory under web root and name it "cgi-bin".
- Point the virtual directory to a physical directory, for example c:\inetpub\wwwroot\cgi-bin.
- Give permissions to execute binaries from this directory. The screenshot below shows a typical example.
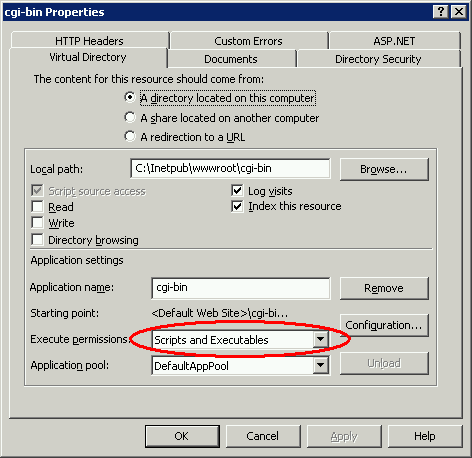
- Make sure that executable permissions for "cgi-bin" include scripts and executables. In the example above the Execute permissions field needs to be set to Scripts and Executables.
- Download the winblast.zip archive file that contains blast binaries and preprocessed blast data files generated from the installed database (Contact us at http://persephonesoft.com/contact for assistance.)
- Uncompress the contents of winblast.zip archive file to this directory. This will add the "wrapper" program webpostn.exe and create two subdirectories: "blastdata" with BLAST library files and "blast" with BLAST executable files. Please note you will need the name and path of this directory in Step 2: Send Us Your BLAST Server Configuration Information. Alternatively, the blast data files can be downloaded from the database. (Contact us at http://persephonesoft.com/contact for assistance with a specialized tool.)
- Next, you need to create a Web Service extension so that the program webpostn.exe can be executed on the server. The example below shows that this can be done by clicking the local computer icon and then selecting Web Service Extensions from the panel on the right.

- Click Add a new Web service extension as shown in the example below.
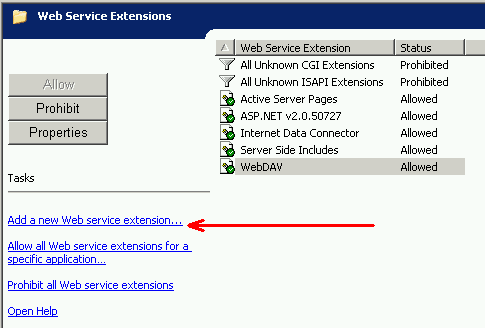
- Create a new Web service extension as shown in the example below.

- Click OK.
Windows Internet Information Services (IIS) 8 Servers
The steps below provide a typical example of creating a BLAST server on a Windows Internet Information Services (IIS) 8 server. Please note these steps are intended as a general guideline only. For example, steps and configuration windows may vary due to differences between different versions of Microsoft Windows. Please refer to Microsoft's IIS Configuration Reference site for more information.
- Start the IIS Manager.
- Create a virtual directory under web root and name it "cgi-bin".
- Point the virtual directory to a physical directory, for example c:\inetpub\wwwroot\cgi-bin.
- Double click Handler Mapping to give permissions to execute binaries from this directory.
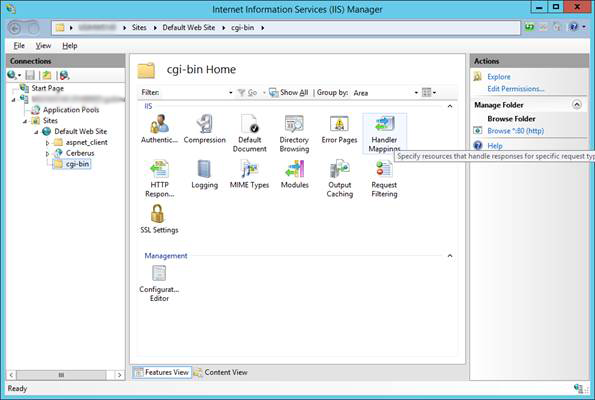
The following will be displayed.
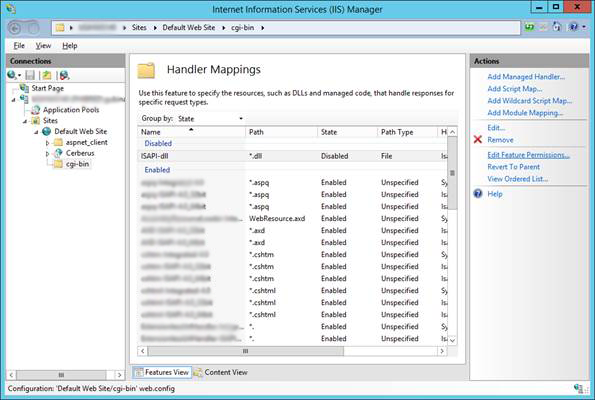
- Under Actions click Edit. The following pop-up window will be displayed.
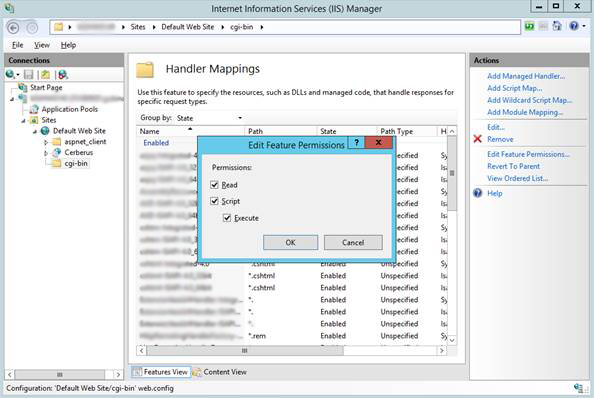
- Check (select) Read, Script, and Execute and then click OK.
- Download the winblast.zip archive file from Persephone Software, LLC. (Contact us at http://persephonesoft.com/contact for assistance.)
- Uncompress the contents of winblast.zip archive file to this directory. This will add the "wrapper" program webpostn.exe and create two subdirectories: "blastdata" with BLAST library files and "blast" with BLAST executable files. Please note you will need the name and path of this directory in Step 2: Send Us Your BLAST Server Configuration Information.
- Next, you need to create a Web Service extension so that the program webpostn.exe can be executed on the server. The example below shows that this can be done by clicking the local computer icon and then selecting Web Service Extensions from the panel on the right.

- Click Add a new Web service extension as shown in the example below.

- Create a new Web service extension as shown in the example below.

- Click OK.
Linux Servers
The steps below provide a typical example of creating a BLAST server on a Linux server. Please note these steps are intended as a general guideline only. For example, steps may vary due to differences between different Linux distributions and different versions of the operating system. Please refer to your Linux server documentation for more information.
- Unpack the contents of linuxblast.gz file we sent you to a web server directory that has permissions to execute binaries. (In most cases this is "cgi-bin".) The following is sample code from an Apache configuration file that sets the execute permissions.
# ScriptAlias: This controls which directories contain server scripts.
# ScriptAliases are essentially the same as Aliases, except that
# documents in the realname directory are treated as applications and
# run by the server when requested rather than as documents sent to the client.
# The same rules about trailing "/" apply to ScriptAlias directives as to
# Alias.
#
ScriptAlias /cgi-bin/ "/var/www/cgi-bin/"
#
# "/var/www/cgi-bin" should be changed to whatever your ScriptAliased
# CGI directory exists, if you have that configured.
#
<Directory "/var/www/cgi-bin">
AllowOverride None
Options None
Order allow,deny
Allow from all
</Directory>
- Please make sure that the shell script webpostn.s, the wrapper program webpostn, and all BLAST files have the proper execute permission set. Please note the shell script webpostn.s is needed to set some temporary environment variables for the wrapper and BLAST executable files. You will need to edit it and set the location of BLAST home directory to the full path of blast directory, for example:
set BLAST_HOME=/var/www/cgi-bin/blast
Please note you will need the name and path of this directory in Step 2: Send Us Your BLAST Server Configuration Information. The full path of your "cgi-bin" directory will then be incorporated into Persephone's configuration file (Persephone.exe.config).
- Optional. In case you wish to monitor the BLAST server's activity you can set up a log file that will contain BLAST command lines and text of web POST requests. To do this you need to set a WEBPOST_LOG environment variable that will tell the BLAST wrapper the location of the log file. For example,
c:\tmp\blast.log
or
/tmp/blast.log
Please make sure that this location is writable.
Step 2: Send Us Your BLAST Server Configuration Information
After you have configured your BLAST server please send us the following information:
- Your server's operating system, which can be Windows (IIS) or Linux (for example, Red Hat Linux or Amazon Linux).
- The URL
 for the wrapper program (webpostn.s or webpostn.exe) you configured in Step 1: Set Up BLAST Server as shown in the following example:
http://my-webserver.com/cgi-bin/webpostn.s
- The full file system path to "cgi-bin" directory where you unpacked the BLAST server. files in Step 1: Set Up BLAST Server as shown in the example below:
/var/www/cgi-bin
- Alternatively, if you installed your own version of NCBI blast and prepared the data files, please send us the location of blast binaries and datafiles.
