Web Persephone: The Translation Changes dialog
The Translation Changes dialog, accessible from the Variants track, displays the effect of genetic variation (SNPs or indels) on gene translation; it also allows for selection of heterozygous alleles and their effects.
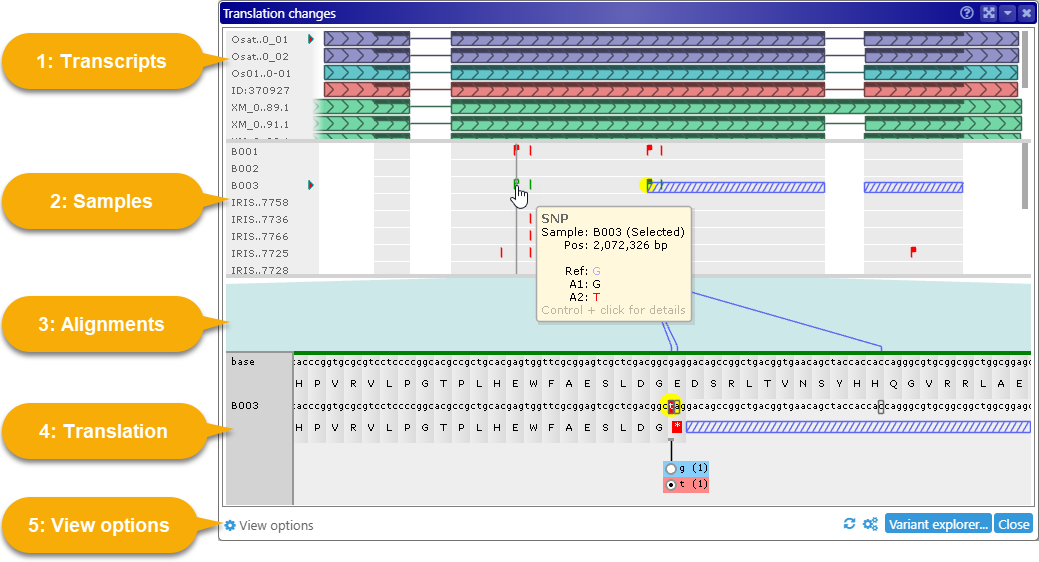
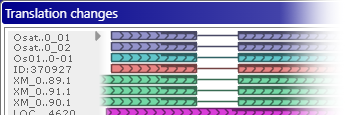
1 Transcripts panel: Shows all transcripts whose CDS regions intersect the interval that was selected on the Variants track; this includes transcripts belonging to hidden Annotation tracks. The name of each transcript is displayed on the left-hand side; move the mouse over this label to see a tooltip with the transcript's full name and other statistics:
Transcript names are abbreviated by default, although you can change this behavior in the View options panel, as described below.
If some of the transcripts do not fit in the panel, you can use the scroll bar on the right-hand side to scroll through them; alternatively, you can position the mouse over the panel and roll the Mouse wheel, or click and drag the panel with the Left mouse button. Hold down the Alt key and roll the Mouse wheel to make the transcripts thicker or thinner: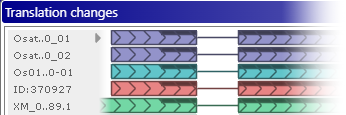
Note
The Alt + Mouse wheel shortcut may not work properly in Firefox.
The currently selected transcript is marked with the  icon. You can click another transcript to select it instead; as you do, panel may zoom in or out slightly to accommodate it, and it will also automatically scroll (if needed) to position the newly selected transcript at the top:

The CDS sequence of the currently selected transcript will be used as the source for protein translation, as described below.
2 Samples panel: Shows all samples that are currently selected in the Variants dialog. The sample names are shown on the left-hand side, just like transcript names; similarly, you can scroll through the samples by using the scroll bar, rolling the Mouse wheel, or dragging inside the panel. You can also move the mouse over the sample name labels to expand them (assuming the names are abbreviated). Click a sample's name to select it; the currently selected sample is indicated by a small triangle icon.
The variants for each sample are drawn using the same colors as on the Variants track: blue for homozygous variants that are identical to reference, red for homozygous variants that are different from the reference, and green for heterozygous variants. In addition, variants that change the protein translation are marked with a "flag" icon. A solid red flag  denotes variant that changes the translation; a hollow white flag
  denotes a heterozygous variant only some of whose alleles affect the translation. You can see some examples of these variants in the screenshots above:
 Homozygous, same as reference
 Homozygous, different from reference, synonymous
 Heterozygous, all alleles are synonymous (i.e. they produce DNA codon changes that do not alter the protein translation)
 Homozygous, non-synonynous
 Heterozygous, some alleles are non-synonymous (but synonymous alleles are also present).
 Upstream variant invalidates the rest of the translation, e.g. by introducing a premature stop codon.
Exon boundaries are indicated with a light gray background; variants that occur outside of exons are hidden.
Click a variant to select it (and the sample it belongs to). The Translation panel will scroll to the selected variant, and the variant will be highlighted in yellow: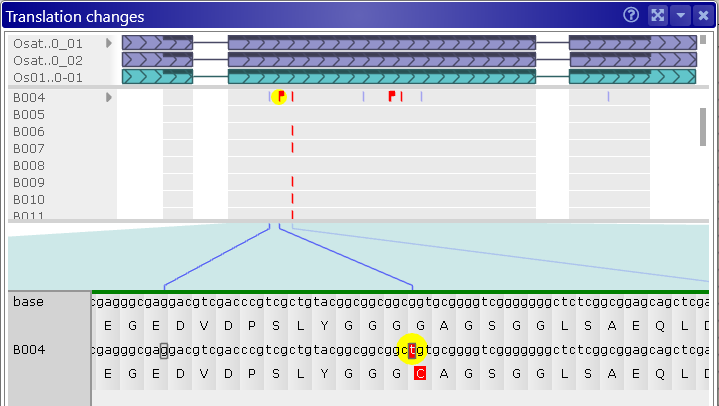
You can also scroll the samples by using the scrollbar on the right side panel, or by dragging them with the Left mouse button.
Mouse over a variant to display a small tooltip listing its position (in nucleotides) and alleles: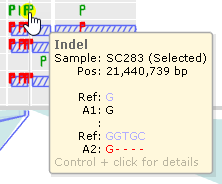
Hold down the Control key and click the variant to bring up its details in the Local Variants dialog.
Note that some variants may be hidden from view, as specified in the View options panel (described below).
3 Alignment panel: Connects variants on the Samples panel to their corresponding codons in the Translation panel below with dark blue lines. Exon boundaries of the currently selected transcript are outlined in teal. You can drag inside this panel (with the Left mouse button) to pan the view.
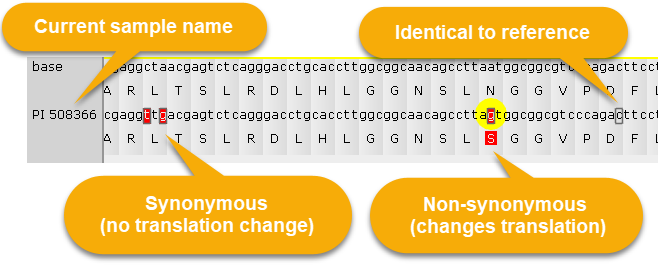
4 Translation panel: Shows the current protein translation. The top line displays the reference sequence; the bottom line displays DNA changes due to the mutations in the currently selected sample, alongside its corresponding protein. Nucleotides affected by variants that are different from reference are drawn on a red background; and if they happen to change protein translation, the corresponding amino acid is likewise rendered on top of a red background. Variants that are identical to reference are outlined with a gray border:
The bar at the top of this panel outlines exon boundaries for the currently selected transcript in alternating yellow / green colors: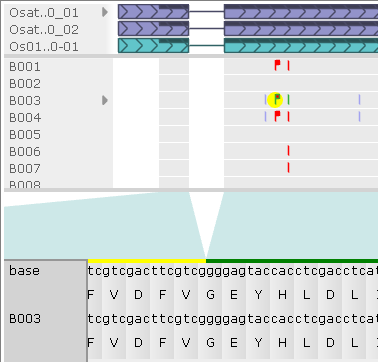
You can mouse over a variant to display a tooltip with its contents and coordinates (in absolute nucleotides as well as amino acids from the start of transcription); the corresponding nucleotide will also be outlined in sea green : 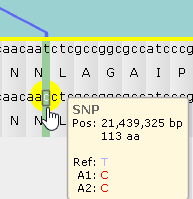
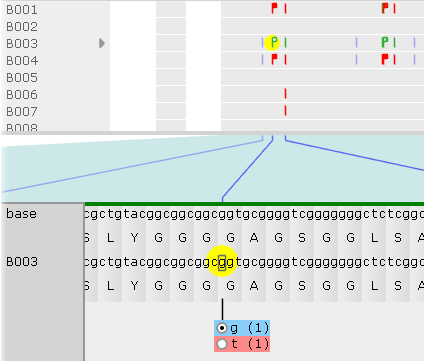
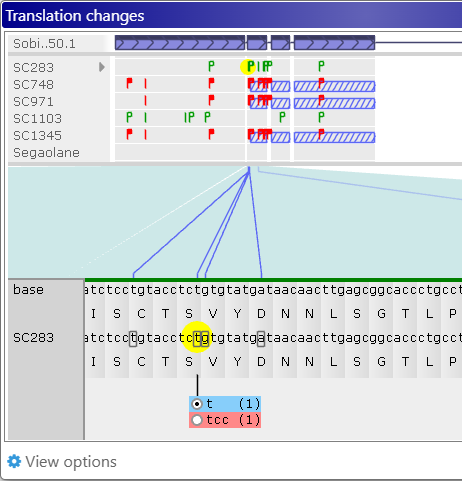
Click the variant to show its allele switcher, where you can choose which of its alleles should be used for protein translation (naturally, this choice is only meaningful for heterozygous variants). In this example, the first allele (g) is identical to the reference; but the second allele (t) is different from reference, and also changes the translation. The number (in parentheses) after each allele indicates its dosage (which could only be 1 or 2 for diploid variants). By default, the allele with the highest dosage will be selected, but you can click the radio button next to another allele to use it instead:

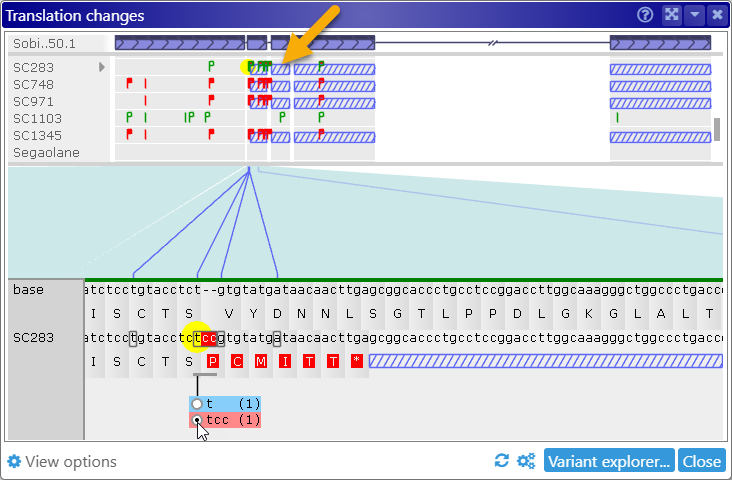
As soon as you select the allele, the protein translation will change, and the corresponding "flag" will turn solid red (). The changed nucleotide will also be underlined, indicating that the allele affecting its translation was manually switched. You can keep switching alleles to mix-and-match them; for example:

Note that some variants might introduce a premature stop codon into the translation. In this case, any downstream variants will have no effect (since they will never be translated), and the affected region will be indicated by cross-hatching, in both the Samples and Translation panels:
A variant could also remove a splice site, thereby expanding the translation into the intron region: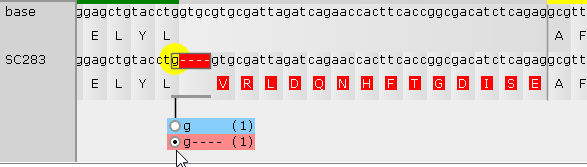
Theoretically, a variant could also introduce a new splice site, but Persephone does not currently track such changes.
5 View Options: Here, you can customize miscellaneous display options for this dialog, and decide which variants should be hidden.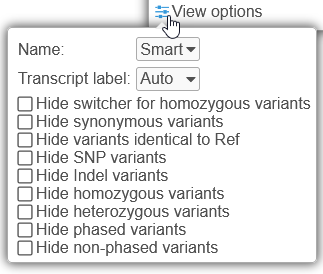
- Name: Choose Smart (the default) to automatically abbreviate long transcript/sample names; Choose Full to always display the full names; or choose None to hide the names completely.
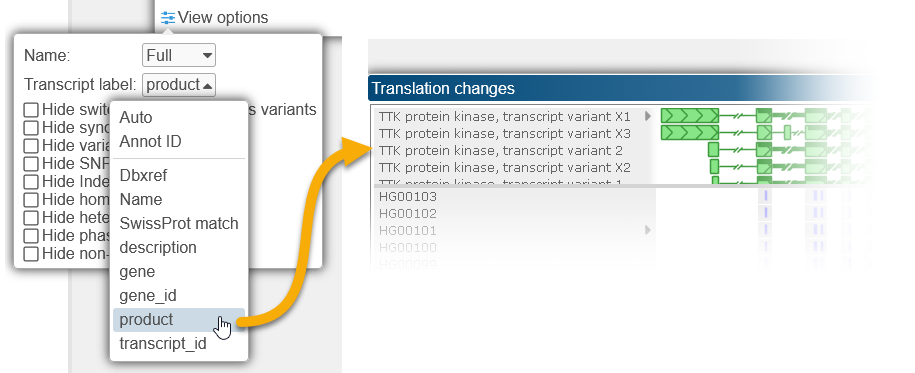
- Transcript label: Select Auto to automatically use the best available label for transcripts (most likely the transcript's name). Alternatively, you can select one of the qualifiers. For example:
- Hide switcher for homozygous variants: Only display the allele switcher for heterozygous variants; clicking a homozygous variant will have no effect.
- Hide synonymous variants: Hide variants resulting in codon changes that are different from the reference yet produce the same protein translation (instead of marking them with a red or green line, as described above).
- Hide variants identical to Ref: Hides variants that are identical to the reference (instead of outlining them with a gray border or a blue line, as described above).
- Hide SNP/Indel variants: Hides single-nucleotide variants and/or insertion/deletion variants.
- Hide homozygous/heterozygous variants: Hides variants of the given zygosity.
- Hide phased/non-phased variants: Hides variants with or without phasing.
The buttons in the bottom-right corner of the dialog provide some additional functionality:
 Resets all allele switchers for heterozygous variants top their default alleles (i.e. the highest-dosage alleles for polyploid variants).
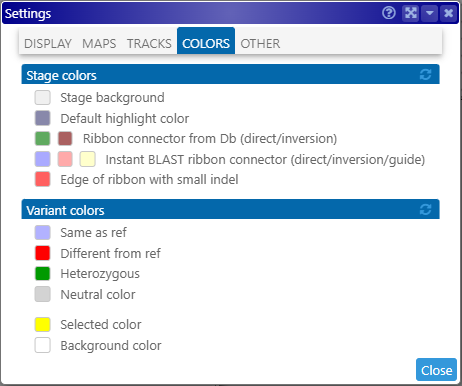
 Opens the Settings dialog, where you can customize variant colors:
Finally, the Variant explorer button re-opens the Variant explorer, where you can select a different set of samples for display.
 Copyright © 2009-2025 by Persephone Software. All Rights Reserved.