Exercise: Installing MariaDb 10.1 under Windows
Here are step by step instructions on how to install MariaDb on a Windows machine, add an empty database schema and create a user with the right permissions.
Download MariaDb 10.1.44 from https://downloads.mariadb.org/mariadb/10.1.44/
Run the installer.

Notice the location of the data folder. You will need to edit the configuration in the file my.ini that will be created there.
Create a user 'root'. Make sure that "Use UTF8" check box is checked.


Change the configuration file my.ini found in the data folder, for example "c:\Program files\MariaDB 10.1\data\my.ini". Replace the highlighted text:
[mysqld]
datadir=C:/Program Files/MariaDB 10.1/data
port=3306
sql_mode="STRICT_TRANS_TABLES,NO_ENGINE_SUBSTITUTION"
default_storage_engine=innodb
innodb_buffer_pool_size=12287M
innodb_log_file_size=50M
character-set-server=utf8
[client]
port=3306
plugin-dir=C:/Program Files/MariaDB 10.1/lib/plugin
with the following:
sql_mode = STRICT_TRANS_TABLES,NO_ENGINE_SUBSTITUTION,NO_AUTO_VALUE_ON_ZERO,ERROR_FOR_DIVISION_BY_ZERO,ONLY_FULL_GROUP_BY
# Strict settings for InnoDB/XtraDB engine
innodb_strict_mode = 1
default_storage_engine = innodb
# This setting makes table names case-insensitive
lower_case_table_names = 1
# utf8 seems to be most efficient for client-server communications
character_set_server = utf8
collation_server = utf8_bin
# setting default time zone to zero removes unnecessary time conversions between server and client
default_time_zone = "+00:00"
# READ-COMMITTED for high performance. NOTE: AWS uses 'tx_isolation' variable
transaction_isolation = READ-COMMITTED
# reduce requirements for creating triggers
log_bin_trust_function_creators=1
# Most important option, memory consumption is mainly controlled by this option
# Set it to at least 4GB for reasonable performance
innodb_buffer_pool_size = 4G
# Very good default settings, applicable to most workloads
key_buffer_size = 32M
innodb_log_file_size = 512M # Another good option is 256M to shorten recovery time (noticeable on Amazon RDS)
innodb_log_buffer_size = 16M
# Those settings are per-thread, so adjust them with care
tmp_table_size = 32M # 16M - 64M, default: 16M
max_heap_table_size = 32M # 16M - 64M, default: 16M
sort_buffer_size = 2M # 2M - 8M, default: 2M
join_buffer_size = 2M # 256K - 8M, default: 256K
# Table definition cache
table_definition_cache = 400 # default: 400
table_open_cache = 2000 # default: 2000
# Turn off query cache
query_cache_type = 0
query_cache_size = 0
# Limits
max_allowed_packet = 64M # default: 16M
max_connections = 500
open_files_limit = 16384
# .Net Timeout
net_write_timeout = 3600
net_read_timeout = 3600
Run "Services" and restart service called MySQL

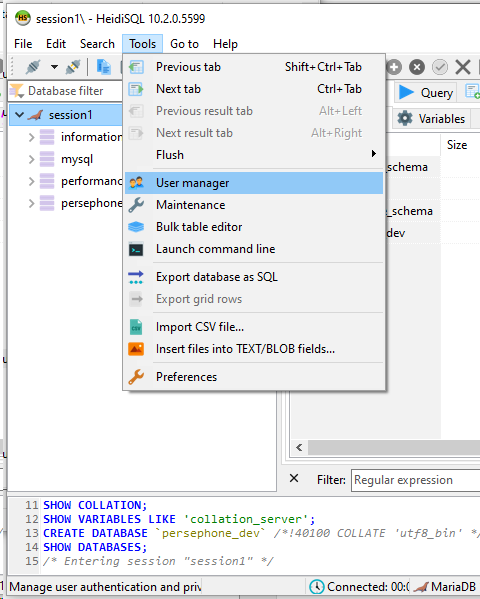
Start HeidiSQL that was installed together with MariaDB. Create a new session, you can call it 'session1' or 'root_session':


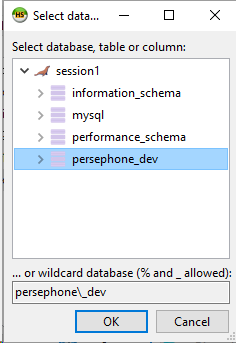
Open the newly created session. Now, it is time to create an empty database schema that will later be populated by PersephoneShell with the command 'init'.

Let's call it persephone_dev.

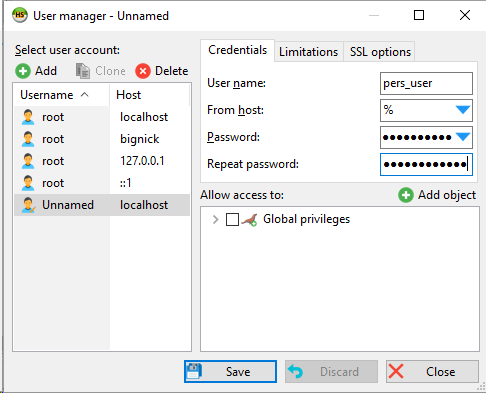
Next step is to create a user.
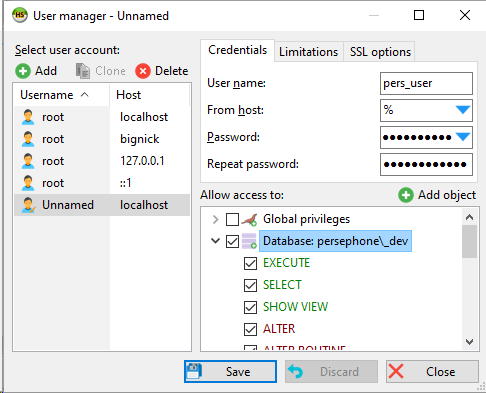
Save. Click "Add object" that will be associated with our database persephone_dev.
This will allow you to give permissions to the user to have full control over the newly created database:
At this point, you can close HeidiSQL.
Your database is ready to be populated by PersephoneShell that will run its initialization script.
 Copyright © 2009-2025 by Persephone Software. All Rights Reserved.