Installing Persephone using Docker
Note:
The following instructions are written for the scenario of running the back end for the web version of Persephone. Although the Docker image also contains the binaries for the desktop (Windows) version, we plan to discontinue its use in the future. To avoid confusion, we removed the commands for managing the Windows version from this page.
The simplest way of installing Persephone software stack is to use a Docker image.
Download and install Docker on your operating system if you do not have it already. For Windows users, we recommend running Docker Desktop.
Loading Persephone image for Docker
Upon downloading the Persephone image for Docker, load it by running the command
docker load < persephone_X.X.tar.gz
where persephone_X.X.tar.gz is the name of the Docker archive with particular version, such as persephone_8.6.tar.gz.
docker load < persephone_8.6.tar.gz
a70daca533d0: Loading layer [==================================================>] 75.16MB/75.16MB
6a04dbe095d4: Loading layer [==================================================>] 20.96MB/20.96MB
aac79b68f3be: Loading layer [==================================================>] 3.072kB/3.072kB
ac0c7b3839f6: Loading layer [==================================================>] 19.23MB/19.23MB
0affd9a3f05a: Loading layer [==================================================>] 924.5MB/924.5MB
d1ea6e8a371d: Loading layer [==================================================>] 7.68kB/7.68kB
e08f29ec2733: Loading layer [==================================================>] 241.5MB/241.5MB
e9bdea284f88: Loading layer [==================================================>] 306.2kB/306.2kB
4fcdf3c880a8: Loading layer [==================================================>] 87.55kB/87.55kB
1d6ba82d4995: Loading layer [==================================================>] 457.3MB/457.3MB
a98db602c0c4: Loading layer [==================================================>] 5.12kB/5.12kB
cad8dbc959ac: Loading layer [==================================================>] 160.2MB/160.2MB
f18df20a8264: Loading layer [==================================================>] 25.64MB/25.64MB
cf19537c4b65: Loading layer [==================================================>] 233.3MB/233.3MB
62c9c867fd81: Loading layer [==================================================>] 29.29MB/29.29MB
5adb8a5ff38b: Loading layer [==================================================>] 19.33MB/19.33MB
c5ce0cc929e8: Loading layer [==================================================>] 7.168kB/7.168kB
093909b6efba: Loading layer [==================================================>] 10.04MB/10.04MB
c900a64d83e1: Loading layer [==================================================>] 3.072kB/3.072kB
1c0331c6ca06: Loading layer [==================================================>] 2.048kB/2.048kB
1eca0c9d75cf: Loading layer [==================================================>] 2.048kB/2.048kB
9434f9e515c6: Loading layer [==================================================>] 1.143GB/1.143GB
415f63e10a5f: Loading layer [==================================================>] 509.8MB/509.8MB
Loaded image: persephone:8.6
Initialize Persephone and start the container:
docker run --name persephone -h persephone -p 3306:3306 -p 8983:8983 -p 8080:1337 -d -v /share:/data/Data persephone:8.6
000e8832be12fac756305a89a0e02eff808b700e57353b8dc2d8e71daa6ba8ba
-p 3306:3306 - if you want to access MariaDb from outside of the Docker container (for example, using HeidySQL. Ask us for credentials). If the host OS already running MySQL on port 3306, change the first number to something different, e.g., 3307:3306
-p 8983:8983 - if you want to open the web page for Solr admin
-p 8080:1337 - redirect ports for WebCerberus (the container listens to 8080), the Docker's internal port 1337 will be seen outside as port 8080.
-v /share:/data/Data - instruction to mount a directory outside of the container, see below.
Important!
The order of the command line parameters is important. Make sure that the image name persephone:8.6 is placed at the very end. All the options should be positioned before the image name.
To start the container (if it has been stopped before):
docker start persephone
Before using Persephone, you might want to update the license and the application with the latest versions. To facilitate this we have a script persephone.sh.
Usage:
persephone.sh COMMAND [OPTIONS]
Command:
install Install and run new docker container with Persephone
Usage: persephone.sh install -z persephone_8.2.1.tar.gz
license Update license file for WebPersephone
Usage: persephone.sh license -l webcerberus.lic
showlog Show last log for WebPersephone
psh Run PersephoneShell on docker
upgrade Upgrade package on Persephone docker container
Usage: persephone.sh upgrade -z WebPersephoneApp_VERSION.tgz
Options:
-d <ContainerName> Define the name of the docker container (default 'persephone')
-l <LicenseFile> Name of the license file for WebPersephone
-n <LinesCount> The number of lines in the displayed logs
-z <GzipFile> An archive with external data for Persephone docker
-p <Port> Port for WebPersephone (default 8080)
-f Force mode for upgrading Persephone packages
Upgrading the software with a new "gzipped" package is done by the command
persephone.sh upgrade -z <PackageGzipName>
To update the license, run the command
persephone.sh license -l <LicenseFile>
Please note that the URL that your users will open to start the Persephone web application should match the URL in the license file. If applicable, this URL should include the port number. For example, the server inside the Docker container is operating on the internal port 1337, which is usually exposed as a different port (the command parameter -p 8080:1337 does exactly that, using the external port 8080). In this case, the URL for opening the application should use this, external (8080) port, for example:
http://persephone.domain.com:8080
Redirecting a URL to a port (optional)
To make it look nicer, you can use a URL with a subfolder (http://domain.com/persephone) and redirect it to the allocated port (8080) in the web server configuration that processes the URL. Such web server (Apache?) is commonly placed in front of the Persephone server to support a secured HTTPS connection. Remember that the license file should have the URL exactly as it is sent to the end users.
Let's for example assume that our URL to open Persephone is http://domain.com/persephone. In case of Apache, the configuration section for redirecting http://domain.com/persephone to http://domain.com:8080 would be similar to this:
<VirtualHost *:80>
ServerName domain.com
ErrorLog /domain.com.error.log
CustomLog /domain.com.access.log combined
DocumentRoot /var/www/html
# Add Trailing Slash (http://domain.com/persephone => http://domain.com/persephone/)
RewriteEngine On
RewriteCond %{REQUEST_URI} /+[^\.]+$
RewriteRule ^(.+[^/])$ %{REQUEST_URI}/ [R=301,L]
# Redirect WebPersephone to another port or another server
ProxyPreserveHost On
ProxyRequests Off
ProxyVia full
ProxyPass /persephone/ http://localhost:8080/
ProxyPassReverse /persephone/ http://localhost:8080/
</VirtualHost>
Important:
Note that the line with ProxyPass and ProxyPassReverse should have the closing slash after the subfolder name: /persephone/ and after the URL with port number http://localhost:8080/.
To use a URL http://domain.com/persephone instead of http://domain.com/persephone/ the configuration contains the lines with RewriteRule:
# Add Trailing Slash (http://domain.com/persephone => http://domain.com/persephone/)
RewriteEngine On
RewriteCond %{REQUEST_URI} /+[^\.]+$
RewriteRule ^(.+[^/])$ %{REQUEST_URI}/ [R=301,L]
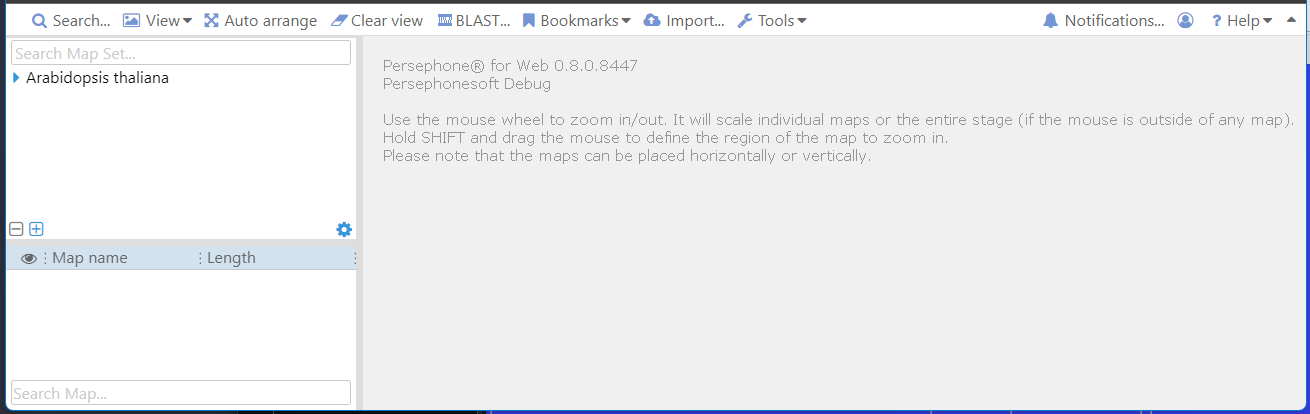
Starting Web Persephone
Navigate to the URL discussed above in a web browser. It should open the application that shows the tree of genomes on the left of the page. At the very first launch, it will display a single genome of Arabidopsis thaliana supplied with the docker image. Note the application version displayed when the background is empty. The licensee name is listed on the second line of the text in the main stage.
Populating the database
Now you are ready to start populating the database using the copy of PersephoneShell available in the Docker container. Start it by the command
./persephone.sh psh
Welcome to Persephone docker tool V 1.1.7878
Found container 'persephone'
PersephoneShell. Built on Feb 16, 2023 21:02
Copyright (C) 2014-2023 Persephone Software, LLC.
$DATA variable is set to '/data/Data'
TempDir=/data/Temp
Opening database connection persephone...
Using BLAST binaries from '/data/NCBIBlast'
BlastDataDir=/data/BlastDB
Connecting to Solr server... Found server version 8.11.2
Checking Solr schema compatibility... compatible
Using Solr server at http://localhost:8983/solr/, core name: persephone
Mounting host directory into a container
To be able to use local files for loading the data, you will need to mount additional directories when starting the container with the command 'docker run'. Depending on the version of your operating system and Docker, different ways of mounting directories can be used. When running the container add the parameter for mounting the folders (before the image name!), for example:
-v /share:/data/Data
Here, /share is the folder outside Docker that will be seen inside the container as /data/Data. Note that /data/Data folder is already referenced in the configuration file for PersephoneShell under the instruction DataDir=/data/Data. If you want to change its location, you will need to use the right path also in the mounting argument described here.
Another way of mounting directory is using the following parameter:
--mount type=bind,source=/share,target=/data/Data
Please consult the documentation for mount command at the Docker website.
To get to the command line prompt inside the container run this command:
docker exec -it persephone bash
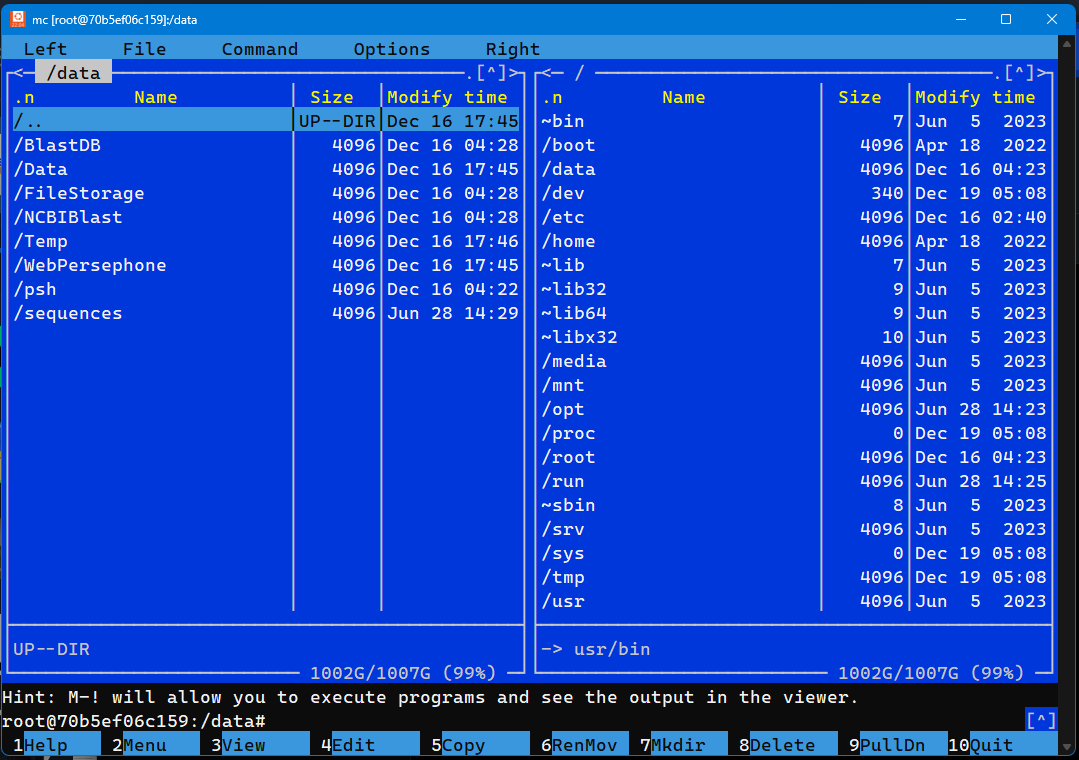
The main folder with components of the Persephone software package is located in the directory /data:
root@ce30e25f1b23:/# cd /data
root@ce30e25f1b23:/data# ll
total 40
drwxr-xr-x 1 root root 4096 Feb 17 04:40 ./
drwxr-xr-x 1 root root 4096 Feb 17 04:40 ../
drwxr-xr-x 1 root root 4096 Feb 16 20:09 BlastDB/
drwxrwxrwx 1 root root 4096 Feb 17 04:40 Data/
drwxr-xr-x 1 root root 4096 Feb 16 20:00 NCBIBlast/
drwxr-xr-x 1 root root 4096 Feb 16 20:00 psh/
drwxr-xr-x 1 root root 4096 Feb 16 20:08 sequences/
drwxr-xr-x 1 root root 4096 Feb 16 20:49 Temp/
drwxr-xr-x 1 root root 4096 Feb 16 20:48 WebPersephone/
The folder psh contains the control INI files in the sub-directory Samples. To learn about loading the data into the Persephone system please consult the documentation for PersephoneShell.
It might be convenient to use one of the mounted directories to access the data files that can be copied from the host system.
The first thing in configuration of PersephoneShell is setting the $DATA variable which defines the root directory for the data files. The data files for loading into the Persephone database are typically referenced in the INI control files using this variable $DATA. If you have a mounted directory, it is recommended to use it as $DATA. This variable is preset in /data/psh/psh.exe.config supplied with the Docker archives:
<PersephoneShell ... DataDir="/data/Data" ...>
Example of using $DATA with a mounted directory
Let's assume that we mounted the host directory /share as /data/Data inside Docker. The data root $DATA points to that mounted directory. This will now allow placing a FASTA file, for example for the soybean genome, into the (host) directory /share/soybean/genome.fa and reference it as $DATA/soybean/genome.fa in the INI files for loading genomic sequences. This way, by using the mounted directory for large data files, we are avoiding copying them into the Docker container.
In a similar manner you can copy the sample INI files to the mounted folder and edit them by using your favorite text editor outside Docker.
The provided Docker container has a popular linux file manager Midnight Commander that can be started by the command 'mc'. It has its own text editor 'mcedit' that is called if you press F4 for the selected file. Please try it, you may like it.
 Copyright © 2009-2024 by Persephone Software. All Rights Reserved.