
Web Persephone: External Data Sources
Persephone can connect to external data sources and simplify the process of importing their data. To open the Connect external data sources dialog, click on the Connect button in the bottom-right corner of the Map Set tree:

Every tab at the top of this dialog represents an external database. At present, you can browse and import data from NCBI Datasets as well as Track Hubs.
NCBI Datasets
To open an NCBI assembly, type a search term in the search box and press Enter (or click the Search button). You can search for an exact NCBI accession (GENBANK or REFSEQ); or for an organism by its common or taxonomic name:

By default, the list of available assemblies displays assembly name, organism, accession, and the number of available chromosomes and contigs for each assembly. As always, you can edit the list of columns if you wish to see more data, e.g. Total sequence length:

You can also quick-search, filter, or sort the list of assemblies by their column values; for example, you could choose to show only REFSEQ assemblies:

Click an assembly to open it:
NCBI Assembly details

This view opens to display all tracks in the NCBI assembly that are available for import. You can also click the Sequences tab at the top to view the available genomic sequences, or click the Dataset Report tab to view the raw assembly metadata from NCBI. The links in the upper-right corner of the dialog will open in new browser tabs to show the original NCBI sources for this assembly:
- NCBI FTP repository: Opens the FTP repository where all of the source files are stored; note that this repository may contain additional data files (notably variants in VCF format) that cannot yet be imported automatically. You may still be able to copy the URL to one of these files, then import them manually using Persephone's standard Import dialog.
- Open in NCBI Datasets: Links directly to NCBI's web page for the currently selected assembly, listing its metadata, statistics, associated publications, and other useful information.
In addition, you can right-click any track and select the Copy file URL option to copy a direct link to its source file to the clipboard:
Some assemblies may contain a large number of quantitative tracks representing e.g. gene expression or methylation values for a variety of tissues, experimental conditions, and so on. Because it would be impractical to display all of these tracks simultaneously, they are provided in a separate pop-up window: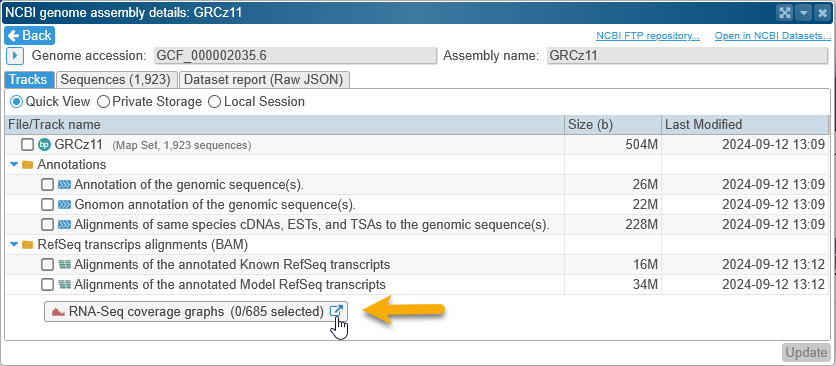
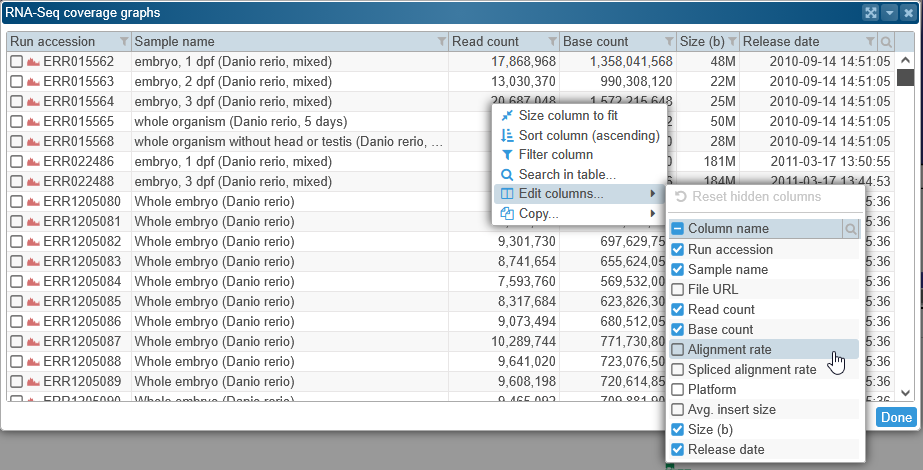
In this window, you can sort and filter the available tracks and then pick the most interesting ones (don't forget to check the list of available columns for additional metadata). Once your chosen quantitative tracks are loaded, you can combine them into a single view (using multi-trace) to produce a more compact view.
If you wish to select a different assembly, click the Back button in the upper-left corner to go back to the assembly search results.
The Import mode selector determines where and how the imported data will be stored.
Import mode: Quick View
This mode is only available for NCBI data sources (and is the default). It is designed to provide quick and robust access to NCBI's data, and is the best option if you wish to quickly browse the assembly without performing in-depth analysis. When Quick View is selected, a checkbox appears next to each track; check the box to select the track for import. The associated genomic maps will be automatically selected for import into a new Map Set:

Once you are done making your selections, click the Add button on the bottom-right. Persephone will then begin loading the selected tracks to shared storage. If you or any other user had previously requested these tracks, they will be available instantly; otherwise, the import process may take some time. You can check on its progress by clicking the notification icon on Persephone's main toolbar:
Once the tracks have been loaded, Persephone will automatically display the first available map (typically Chromosome 1). The checkboxes next to each imported track will change to  icons; click one of these icons to remove the associated track from Persephone (you can always bring it back by checking its checkbox and clicking Update). The assembly (and all of its tracks) resides in its own Map Set, organized under the teal-colored Quick View node in the Map Set tree:
Thus you can always browse the NCBI assembly's maps by selecting its Map Set in the tree. In addition, its associated Map Set will be indicated in the assembly list, as well as in the Assembly details view:

Click the Map Set's label to open its details, or click the  icon to navigate to the imported Map Set in the Map Set tree.
In addition, the Assembly details view is automatically displayed in the Map Details and Map Set details dialogs, in a separate tab at the top:
The Quick View mode supports most of the core functionality in Persephone; for example, you can view Annotation details for gene annotations (along with their transcripts and sequences), drill down into BAM read details, produce instant Sequence alignments using BLASTN and minimap2, and so on. However, some functionality is not yet available in Quick View mode. For example, you cannot attach your own tracks to Quick View Map Sets (other than the tracks available at NCBI); nor can you run BLAST against them in bulk nor search for track features by name.
To apply the full range of Persephone's features to the external tracks, you must change the Import Mode selector to one of the other two options: Private Storage or Local Session. Both of these options are shortcuts for Persephone's general Import workflow.
Import Mode: Private Storage
In this mode, imported files will be loaded into your long-term private storage, and attached to one of the previously loaded Map Sets, either in Persephone's main database or in your own private storage.

In many cases, you would first want to import the genomic sequences into a new Map Set. To do so, click the  button next to the prospective Map Set (always shown at the top of the list):

Persephone will then open its standard Import dialog, and begin loading the sequences:

On the next screen, you can choose which maps should be imported and which should be discarded, edit their map names and chromosome names, and so on; or you can just click Next to accept the defaults and import all available maps. The screen after that allows you to change the new Map Set's organism and visible name, as well as its description.

Finally, the newly imported sequences will be indexed for BLAST, and the new Map Set will appear in the Map Set tree. It will also be automatically selected in the Map Set selector:

You can now begin loading additional tracks in this NCBI assembly, and attaching them to the newly loaded Map Set. Alternatively, you can click the dropdown button to select another Map Set:
To load a track, click the button next to it. For example, you can choose to import the gene annotation track; Persephone will then begin loading the source file:

On the next screen, you will be prompted to assign maps in the source file to the previously loaded sequences in the Map Set. In this example, both the gene annotation track and the sequences came from the same NCBI assembly, and so their map accessions should match perfectly; check the Use Map Accession checkbox to perform the match:

Alternatively, you can perform the match manually, choosing which maps to import and which to skip, and you can even select a different Map Set if desired. Note that, while NCBI assemblies are manually curated and generally accurate, some of the data files may still contain mistakes. For example, in this case one of the contigs contains annotations that lie outside of its genomic sequence:
A small number of such warnings (indicated by  icons in the map list) is usually acceptable; but if most of the maps display warnings, then you should double-check the currently selected Map Set to make sure that it refers to the correct version of the genome.
On the next screen, you will have the opportunity to change the properties of the newly imported track (such as its name and color). Finally, the track will be indexed for BLAST and text Search, and the newly loaded track will appear on the map:
The track will be shown with a teal background, indicating that it is stored in your long-term private storage.
Loading tracks into long-term private storage is the most robust option, but doing so takes additional time and consumes your storage quota (also, some data formats cannot be loaded into private storage at this time). The alternative is to load tracks into your local browser session.
Import Mode: Local Session
In this mode, tracks are loaded into your local browser session directly from the remote data source (e.g. NCBI or a Track Hub). Tracks loaded in this manner will disappear when you close the browser (or reload Persephone's browser tab); however, they can be displayed almost instantly and consume no storage quota. This mode is especially useful for large data files such as BigWig and BAM tracks.
To display a track in the local browser session, click the button next to it. Note that some of these buttons may be disabled, usually because the source file's data format is not yet supported for local session viewing:

Fortunately, BAM files are supported. To view one, firs select a Map Set with the corresponding genomic sequences as described above (you may first need to import the sequences as a new Map Set in your private storage). Once you click the button, Persephone will display an abbreviated map matching form, prompting you to assign maps in the input file to maps in the selected Map Set. As before, matching by map accession will most likely prove sufficient:
Note that in this example the input file contains data for only some of the maps in the underlying assembly, not all of them -- such cases are not uncommon. When you finish map matching, click Done, and the imported track will appear on the map:
The track will be shown with a pink background, indicating that it is loaded into the current browser session, and will disappear when you close Persephone.
Persephone will remember your map assignments, and list them next to the currently selected Map Set:
The next time you the button to load another track, Persephone will attempt to reuse the map assignments (if possible). Click the  button to clear them if you wish to start from scratch.
Track Hubs
Track Hubs are user-defined collections of data files, attached to a specific genome (or a set of several genomes) and arranged as a structured file directory. While anyone can create and publish a Track Hub, some of the most popular Track Hubs are listed in the UCSC Track Hub Registry. Persephone provides a convenient way to access these (and any other) Track Hubs. To connect to a Track Hub, open the Connect external data sources dialog, then click on the Track Hubs tab: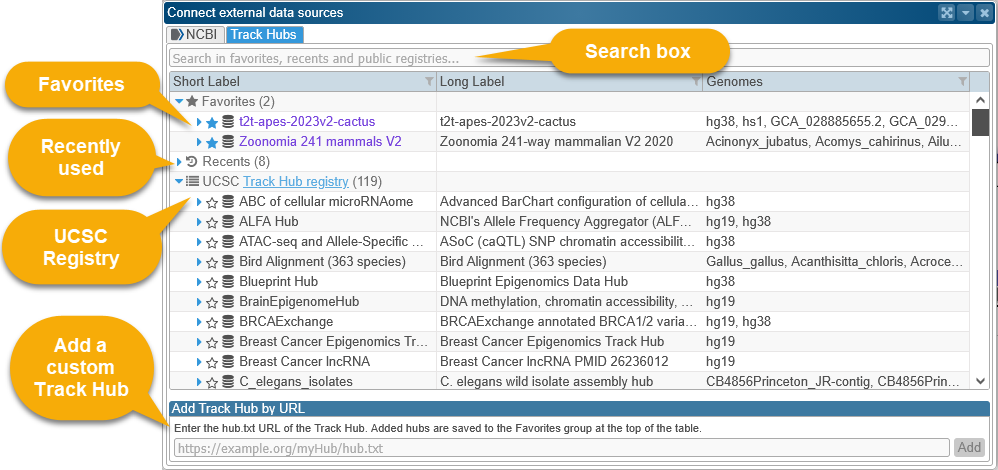
The Track Hubs are arranged in a tree structure.
The top node displays all the Track Hubs marked as your Favorites. To mark a Track Hub as a Favorite, click the  icon next to it; the icon will change to
  , and the Track Hub will appear in the list of Favorites. Click the icon again to remove it from the list.
The next node displays the top Recently used Track Hubs (regardless of whether they were marked as Favorites or not), thus making it easier to repeatedly switch back and forth between multiple Track Hubs.
The node underneath list all the Track Hubs available in the UCSC Track Hub Registry.
To find a Track Hub, look for it in the list, or start typing in the search box: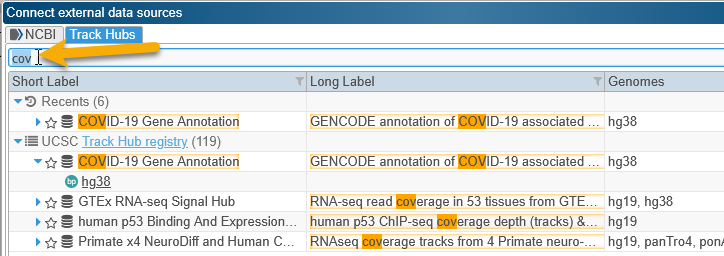
If you wish to see more details about a Track Hub, right-click it and choose Copy hub.txt URL to copy its definition to the clipboard; or click Copy description URL to obtain a link to its detailed description (as provided by the creator of the Track Hub):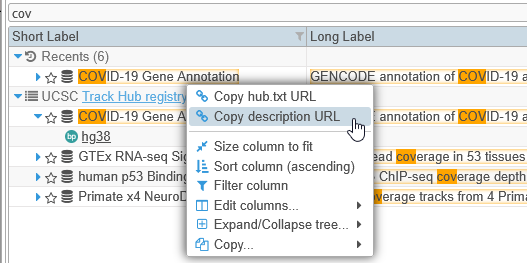
Track Hub details
Click a Track Hub to see the list of genomes it covers, then click one of the genomes to view its tracks:
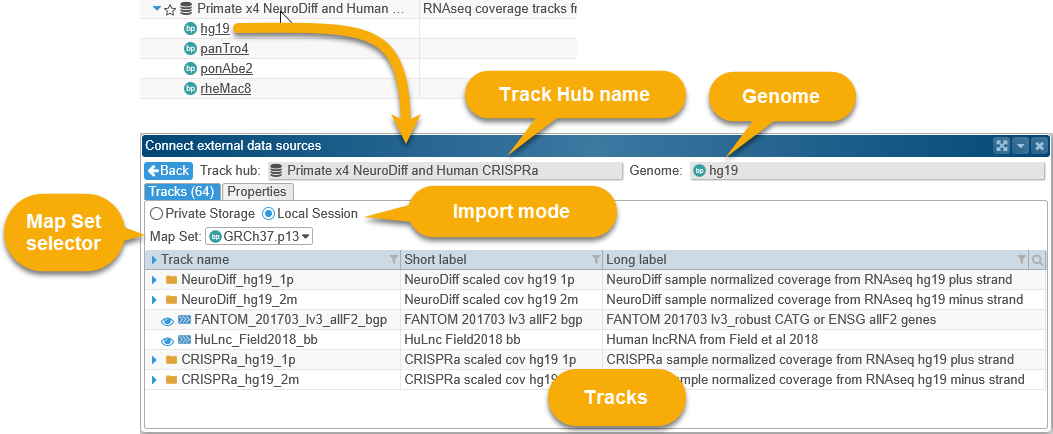
The name of the Track Hub and the currently selected genome are listed at the top, followed by the Import Mode selector and the Map Set selector, and then the list of available tracks; you can also click over to the Properties tab to view detailed information about the Track Hub.
The list of tracks may be organized into folders (as designed by the Track Hub's creator). By default, Persephone displays only the name and the short and long labels for each track, but you can always right-click anywhere in the tree and select Edit columns to display more information: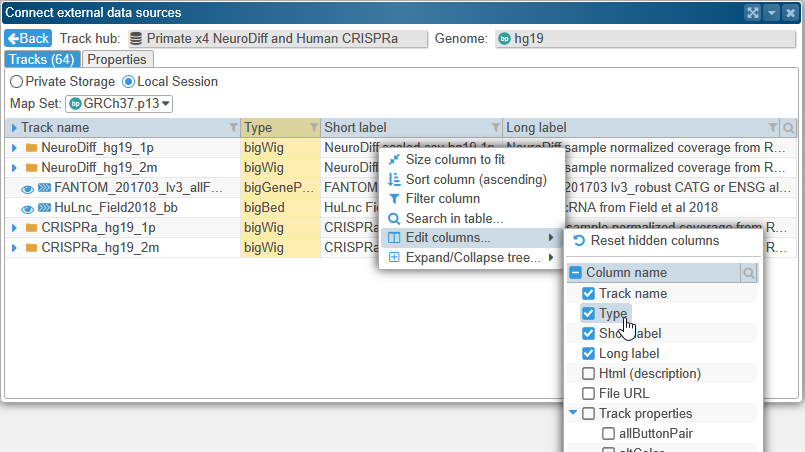
Loading tracks from Track Hubs
Loading tracks from a Track Hub works mostly the same way as loading tracks from an NCBI assembly (as described above), with a few minor differences:
- The Quick View mode is not available for Track Hubs; instead, you can choose between loading the tracks into your long-term private storage, or viewing them in the local session.
- To load any track, you must first select a Map Set in the Map Set selector. This could be one of the existing Map Sets in Persephone's database, or a Map Set that you have loaded into your own private storage. Persephone will attempt to guess the correct Map Set based on its name and accession; but it may not always succeed, since (by contrast with NCBI), Track Hubs do not always provide a universal accession number for their genomes.
- Some Track Hubs expose tracks whose data types Persephone does not yet support. Such tracks will still appear on the list, but will be marked by
 icons, indicating that they cannot be loaded (at least not yet):
As before, to load a track, click the the button to the left of it: when loading into private storage, or the button when loading into the local session. Persephone will then examine your chosen data file, and may prompt you to associate maps in the file with maps in your chosen Map Set: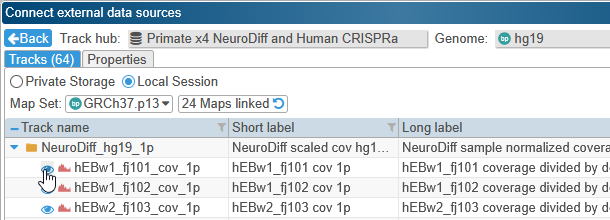
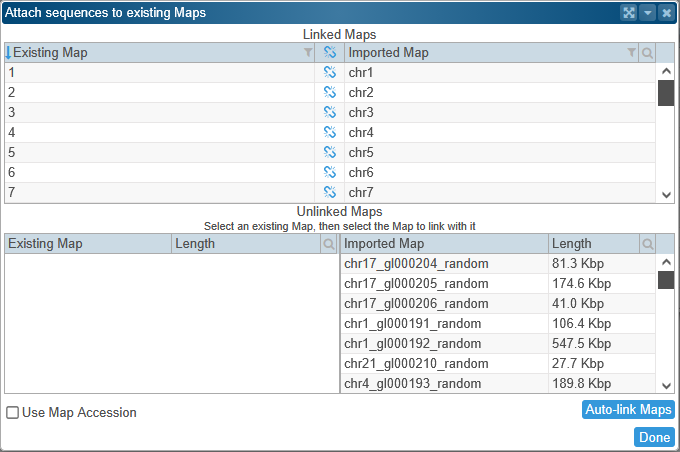
When you click Done, Persephone will display the track right away (if loading into the local session), or follow the steps to fully import it into your private storage, index it for full-text search and BLAST, etc., before displaying it: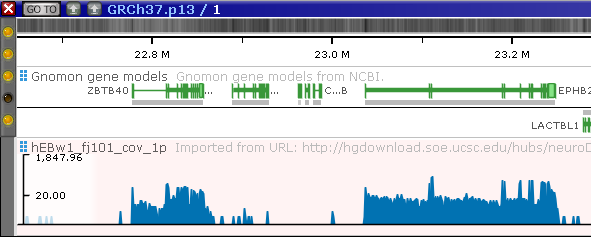
When you are done, click the Back button (in the upper-left corner of the dialog) to go back to the list of Track Hubs.
Adding a custom Track Hub
To add a custom Track Hub, enter its URL into the input box underneath the list of available Track Hubs, then click the Add button.
For example, you can enter the following URL, which points to a Track Hub containing DNA methylation signatures for hg38 (Homo sapiens):
https://raw.githubusercontent.com/ccmbioinfo/EpigenCentral-UCSC-Genome-Browser/refs/heads/main/hub.txt
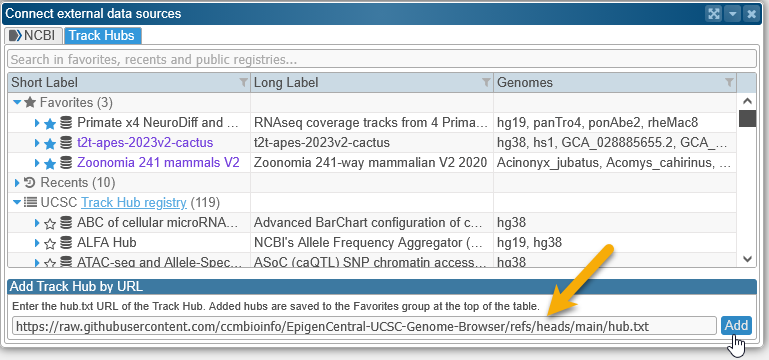
Assuming the Track Hub is online, it will be automatically added to your Favorites, and its node will be expanded to show all of its available genomes: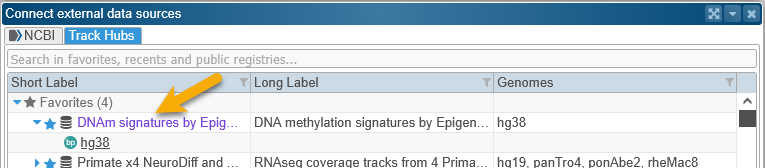
As it happens, this particular Track Hub exposes a single genome (hg38) with only a single track, showing areas of DNA methylation: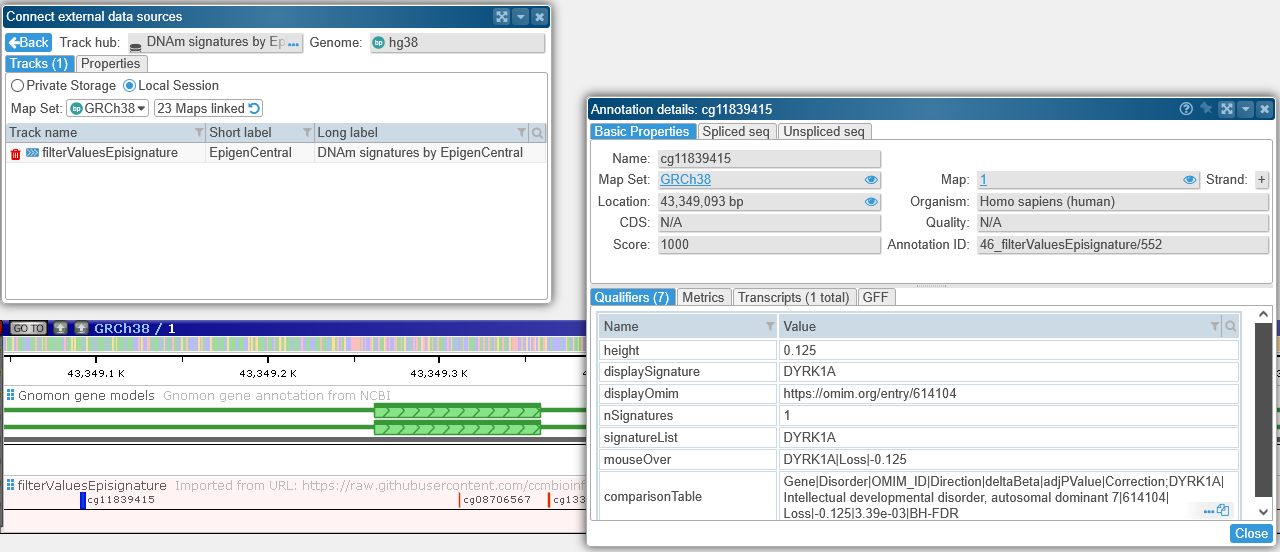
Note that if you remove this Track Hub from your Favorites, it will remain in the Recently used list until some other Track Hub overwrites it.
 Copyright © 2009-2026 by Persephone Software. All Rights Reserved.