Web Persephone: Export
Persephone provides a unified export and analysis interface for a variety of scenarios, depending on the type of data being exported, the scope of data to be examined, and the desired output file format. Most of the common export controls are described below; the following help pages provide more information about individual scenarios.
Note
Currently, only data in the main Persephone database can be exported; export is not yet supported for user data loaded via drag-and-drop.
Exportable data types:
- Annotations: Gene annotations or transcripts (including their sequences), as seen on Annotation tracks.
- Markers: Features on genetic or physical maps (including the sequence covered by the marker), as seen on Marker tracks.
- Quantitative data: Regions on a map associated with a numeric value, as seen on Quantitative tracks.
- Genomic sequences: Sequence fragments (or entire sequences) of physical maps.
Scope of export:
- Map region: Data contained in a single track on a single map, optionally restricted to a region.
- Map set: Data contained on a single track across the entire map set.
- Named features: A list of exact names of specific features (e.g. annotations, markers, or maps).
- Search results: The list of results from a keyword Search query.
File formats:
- CSV/TSV: Comma-Separated (or Tab-Separated) Values; this is the most common export format.
- FASTA: Multiple sequences with customizable headers.
- GENBANK: Annotated genomic sequence in GenBank format; only supported for Annotation tracks.
- GFF: The 9-column GFF format containing metadata for annotations; only supported for Annotation tracks.
Common Export controls
To see a typical Export dialog, right-click on any track, and choose Export track region:
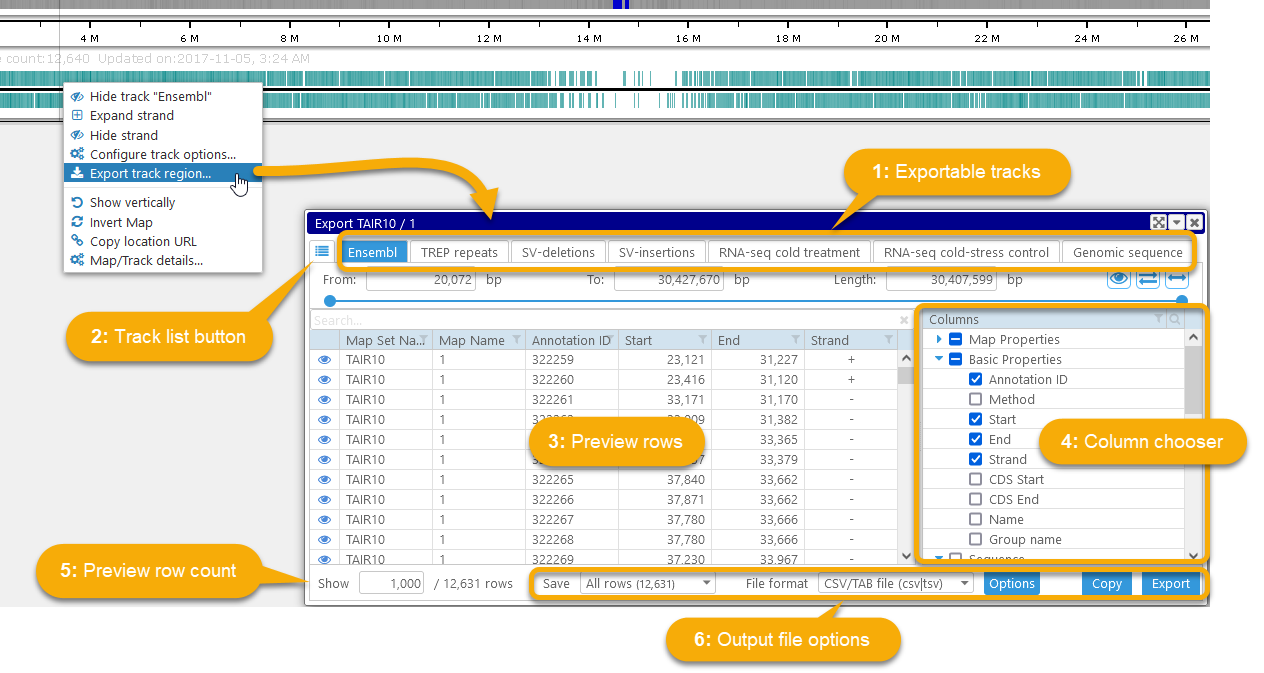
1: All of the exportable tracks are usually shown as individual tabs at the top of the dialog; note that tracks that are hidden on the map are still available for export. However, if the map contains too many tracks to fit into individual tabs, the tracks will be displayed as a tree:

You can use the common filtering controls in the tree to quickly find a specific track. Press the 2: Track list button to manually switch between tabbed or tree-like view of tracks.
3: The bulk of the Export dialog is occupied by the preview table that contains a sample of all the rows available for export; in this example, we are exporting the Ensembl annotation track, and thus every row represents a single annotation. This table likewise supports the common filtering controls, as well as the advanced search bar at the top. As usual, you can Ctrl-click individual rows to select or deselect them; Shift-click to select a range of rows; or press Ctrl-A to select all rows.
4: The column chooser displays all exportable properties of the features that are being exported, including their map coordinates, sequences (if any), and qualifiers. The exact contents of the tree will depend on the type of data being exported (for example, the "Exon count" column is only available for gene annotations).
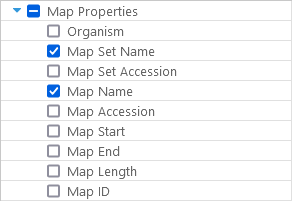
Most export types support exporting metadata properties of the map where the exported features reside:
If the exported features include qualifiers (as is the case for most gene annotations and markers), all of the available qualifiers will be shown in the the column chooser:
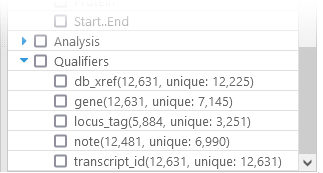
The numbers next to each qualifier list the total number of times a qualifier occurs in the currently selected export scope (e.g. a region on the map), as well as the number of unique values. In this example, while 12,481 annotations have the "note" qualifier, only 6,990 of these "note"s are unique.
5: By default, only the first 1,000 rows are shown in the preview table; but you can increase (or decrease) this preview row count by entering a new value in this textbox. The total number of available rows is shown immediately to the right; in this example, this is the total number of annotations available on the Ensembl track on the first chromosome of TAIR10 ().
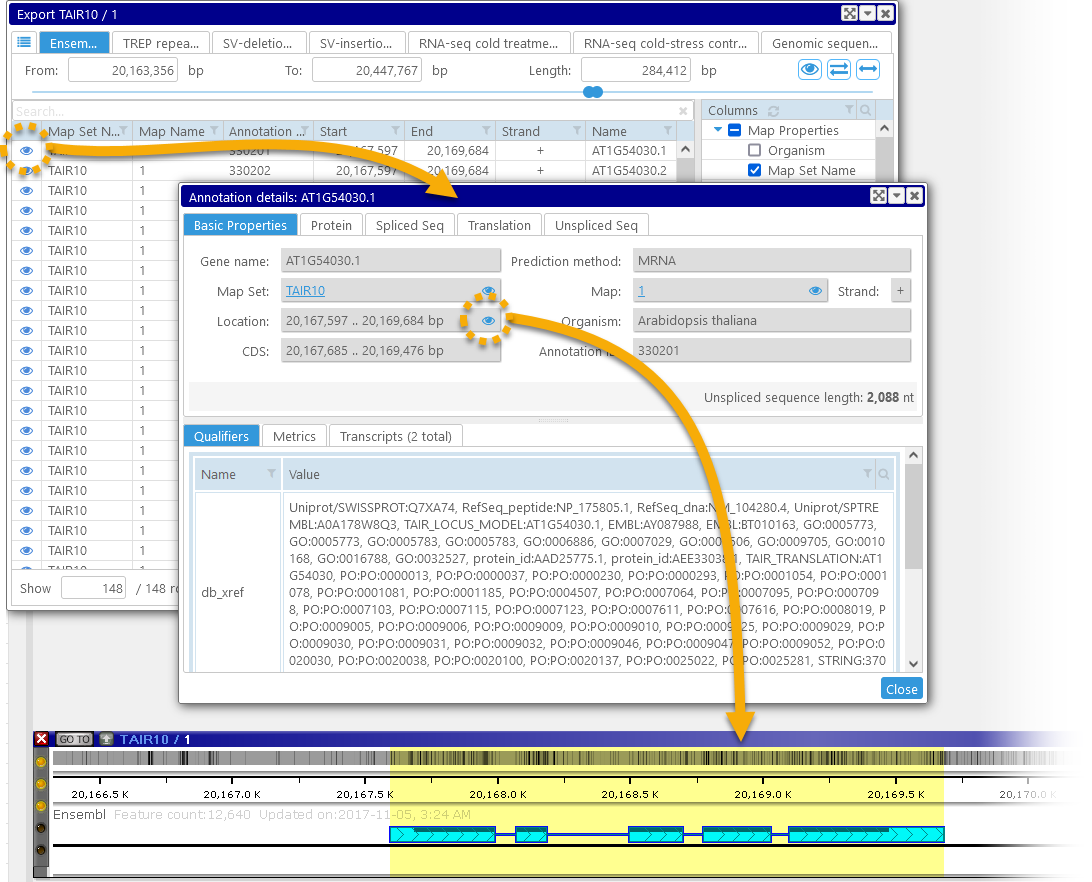
Press the  button next to a row (on the left side) to view details about the corresponding feature; in this example, clicking the button will open the Annotation details dialog. You could then reveal the annotation on its map, as usual:
6: Here, you can select which rows you wish to export, as well as the output file format.
- All rows: Export all available rows; this is the default setting.
- Preview rows: Export all rows currently shown in the preview table.
- Selected rows: Export only those rows that are currently selected in the preview table. This option can be useful for filtering out specific rows to export. For example, you could increase the preview row count to maximum (all 12,640 rows), and then filter the table to only show annotations on the forward (+) strand:
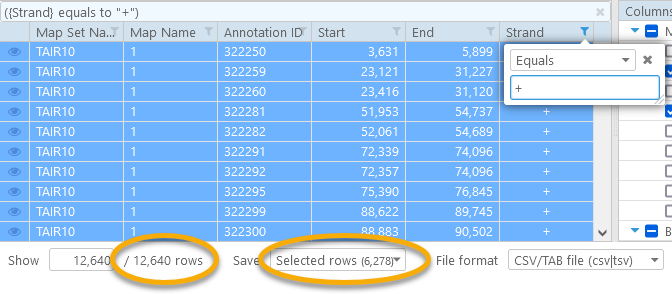
Press Ctrl-A to select all visible rows, and choose Selected rows in the dropdown box. In this case, only 6,278 annotations (roughly half) will be exported.
The list of available export file formats depends on the type of data being exported (but typically includes CSV). Click the Options button to configure the output file (e.g. to choose comma-separated vs. tab-separated values, or to edit FASTA headers).
Finally, when you are satisfied with your choices, click the Export button to download the exported data as a file; alternatively, click the Copy button to copy the contents of the file to clipboard. This process can take anywhere from a few seconds to several minutes, depending on the amount of data being exported.
 Copyright © 2009-2025 by Persephone Software. All Rights Reserved.